
Have you ever wanted to bake something special that feels like a warm hug from a sunny morning in Switzerland? This best gipfeli recipe brings that joy right into your kitchen. Gipfeli are those lovely, flaky Swiss pastries shaped like little moons. They taste light and buttery, and this simple gipfeli recipe makes them much easier than French croissants. You can have fresh, golden treats ready in a few hours with some resting time. Even if you are new to baking, you will love how friendly this process feels. It takes about four to five hours total, including rests, and gives you about 12 beautiful gipfeli. Let us walk through it together, step by step, like friends sharing a favorite family secret.
What Is Gipfeli? Understanding Gipfeli Meaning and Pronunciation
Gipfeli is the Swiss name for a crescent-shaped pastry that many people enjoy every day. The word comes from Swiss German and simply means a small peak or crescent, like the shape of a new moon. You say it like “GIP-fuh-lee,” with a soft ‘g’ sound at the start and a light ‘lee’ at the end. It feels fun to say once you try it a few times.
These pastries look a lot like French croissants, but they have their own special place in traditional Swiss food recipes easy to make at home. Swiss gipfeli often use a bit less butter in the layers, so they turn out tender inside with a gentle flake on the outside. They feel more like soft bread with crisp edges. In Switzerland, families and friends eat them for breakfast or a quick snack. This makes the gipfeli recipe a wonderful way to bring a piece of Swiss tradition to your table without needing years of bakery training.
Because gipfeli come from simple roots, this version keeps things straightforward. You do not need fancy skills. Just good ingredients, a little patience, and happy hands in the kitchen.
Ingredients for the Best Gipfeli Recipe
Good ingredients help your gipfeli turn out flaky and full of flavor. Here is what you need for the basic dough that makes about 12 pieces.
For the dough you will use:
- 4 cups of all-purpose flour, which gives the structure
- 1 and 1/3 cups of lukewarm milk, to help the yeast grow nicely
- 2 and 1/4 teaspoons of active dry yeast, for that gentle rise
- 3 tablespoons of sugar, to add a touch of sweetness
- 1 and 1/2 teaspoons of salt, to balance all the tastes
- 1/2 cup of soft butter, mixed right into the dough for tenderness
For the lamination, which creates those pretty layers, you will need another 1 and 1/2 cups of cold butter. Keep this butter firm so it stays in separate sheets inside the dough.
You can also add an egg for brushing on top before baking. This gives a shiny, golden color that looks so inviting.
For optional add-ins, think about a little chocolate, jam, or nuts if you want filled versions. Choose high-quality butter because it makes the flavor richer and helps the layers stay crisp. Fresh yeast or good milk also brings better results over time.
These amounts work well together and keep the recipe simple gipfeli recipe easy for anyone to follow.
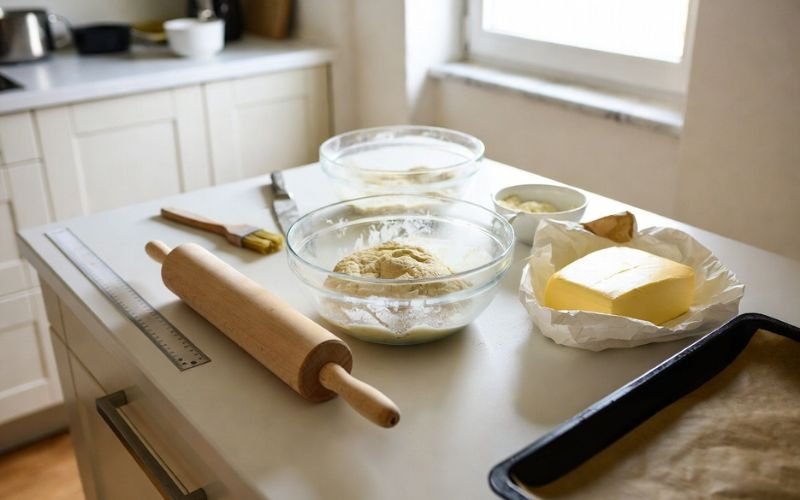
Equipment Needed
You do not need many special tools to make this gipfeli recipe easy at home. A large mixing bowl, a rolling pin, and a clean counter are the main things. A sharp knife or pizza cutter helps with shaping the triangles. A baking sheet lined with parchment paper keeps everything neat in the oven.
If you have a ruler, it can help measure even pieces so your gipfeli look bakery-perfect. A pastry brush works great for the egg wash. Many people use their hands for folding if they do not have a bench scraper.
For substitutions, a wine bottle can stand in for a rolling pin in a pinch, though a real one feels better. A plastic wrap or clean towel covers the dough during rests. These basic items mean you can start baking even if your kitchen is simple.
Step-by-Step Instructions
Making the dough starts the fun part of this simple gipfeli recipe. First, mix the yeast with the lukewarm milk and a teaspoon of sugar. Let it sit for about ten minutes until it looks a little bubbly. This shows the yeast is happy and ready to work.
Next, add the flour, remaining sugar, salt, and soft butter to the yeast mixture. Stir everything until it forms a soft dough. Knead it gently on a floured surface for five to eight minutes until it feels smooth and stretchy. Place the dough in a lightly oiled bowl, cover it, and let it rest in a warm spot for one hour. It should grow bigger and feel airy.
While the dough rests, prepare the butter block. Place the cold butter between two sheets of parchment paper and roll it into a flat square about half an inch thick. Chill it in the fridge so it stays firm.
After the first rest, roll out your dough into a large rectangle. Place the butter square in the center and fold the dough over it like an envelope. This step starts the lamination, which traps butter between dough layers.
Roll the dough gently into a long rectangle again, then fold it into thirds like a letter. Wrap it and chill for 30 minutes. Repeat this rolling and folding two more times, with chills in between. Each fold builds more flaky layers.
After the final chill, roll the dough into a big rectangle about one-eighth inch thick. Cut it into triangles with a base of about four inches. Roll each triangle from the wide end toward the point, curving the ends slightly to make the crescent shape. Place them on your baking sheet with space between them.
Cover the shaped gipfeli and let them proof for one to two hours until they puff up nicely. Brush them with beaten egg mixed with a splash of milk. Bake in a preheated oven at 375 degrees Fahrenheit for 15 to 20 minutes until they turn deep golden brown. The smell will fill your kitchen with happiness.
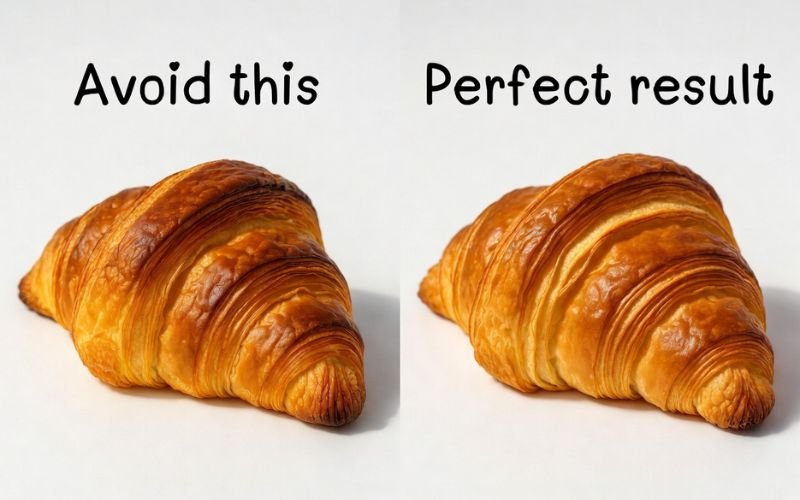
Pro Tips for Flaky Success
Cold butter is one of the biggest secrets to great layers. If it gets too warm during rolling, pop everything back in the fridge for a short time. This keeps the butter from melting into the dough and helps create those light, airy pockets.
Work in a cool kitchen if you can. Many bakers keep their hands cool too by rinsing them in cold water. Gentle rolling pressure matters more than speed. Press too hard and you push the butter out.
Watch the dough during proofing. It should grow but not over-rise, or the layers may fall flat. A little patience here brings much better texture. If your first try has fewer layers, do not worry. Each time you practice this gipfeli recipe, the results get even better.
Popular Variations
One fun way to change this recipe is the Nussgipfel recipe, which adds a sweet hazelnut filling. Mix ground hazelnuts with sugar, a bit of cinnamon, and a splash of milk or apple juice. Spread it on the dough triangles before rolling. The nuts toast nicely inside and give a cozy, rich taste.
For the Mandelgipfel recipe, use ground almonds instead. Add some lemon zest or cinnamon to the filling for bright flavor. These almond versions feel special and pair wonderfully with coffee.
You can also try chocolate-filled gipfeli by placing small chocolate pieces near the wide end of each triangle. As they bake, the chocolate melts softly inside. Other creative twists include adding dried fruit or a touch of vanilla to the dough. All these stay close to Swiss roots while letting you try new ideas at home.
Serving Suggestions and Pairings
Fresh gipfeli taste best right out of the oven or warmed for a few minutes. Serve them on a pretty plate with soft butter and your favorite jam. Strawberry jam is a classic choice that many Swiss families enjoy.
For breakfast, pair them with hot coffee or milky tea. They make a lovely addition to brunch with fresh fruit and yogurt on the side. Kids love them as an after-school snack, maybe with a glass of cold milk. For a special treat, split one open and add a little cheese or ham for a savory version.
These pastries also work well for picnics or family gatherings. Their flaky texture and gentle sweetness bring smiles every time.
Common Mistakes to Avoid
One easy mistake is letting the butter get too warm during lamination. This causes the layers to blend instead of staying separate. Always chill as needed to keep things firm.
Another common issue is rushing the proofing step. If the shaped pastries do not rise enough, they stay flat and dense. Give them time in a warm, draft-free spot.
Over-kneading the dough can make it tough, so stop when it feels smooth but still soft. Using old yeast is another problem that prevents good rising. Check the date on your packet for the best results.
Finally, cutting triangles unevenly leads to pastries that bake at different rates. Take a moment to measure so everything looks and cooks beautifully.
Storage and Make-Ahead Tips
Baked gipfeli stay fresh in an airtight container at room temperature for one to two days. For longer storage, freeze them after they cool completely. Wrap each one well and place in a freezer bag. They keep for up to two months. Warm them in the oven at 300 degrees for about ten minutes to bring back that fresh-baked feeling.
You can also prepare the dough ahead. After the lamination folds, wrap it tightly and chill overnight or freeze for later. Thaw it in the fridge before shaping and baking. This make-ahead step makes the gipfeli recipe even more convenient for busy days.
Conclusion
You now have everything you need to make wonderful gipfeli at home with this best gipfeli recipe. It feels rewarding to pull those golden, flaky pastries from the oven and share them with people you care about. The process is simpler than it looks once you try it, and the delicious results make every step worth it. Give this a go on a calm weekend, and enjoy the sweet smell filling your home. Soon you will want to explore more Swiss baking traditions and create happy memories around the table. Happy baking, my friend!
Frequently Asked Questions
How is gipfeli pronunciation different in various places?
Most people say it as GIP-fuh-lee, but some regions add a softer touch to the sounds. It is easy to learn by listening a few times.
Can I make a gipfeli recipe without a lot of butter?
Yes, you can reduce the butter slightly for a lighter version, though the flakiness may change a bit. Start with good quality and adjust slowly.
What makes this different from a Nidelkuchen recipe?
Nidelkuchen is a creamy Swiss cake with rich topping, while gipfeli are flaky pastries. Both are part of traditional Swiss food recipes easy, but they serve different moments—one for dessert, one for breakfast.
How long does the full process take for beginners?
Plan for four to five hours with rests. Much of that time is hands-off, so you can do other things while the dough chills or rises.
Are there good substitutions for milk or eggs?
Plant-based milk works well if you warm it gently. For egg-free, brush with milk or a little oil for color, though the shine will be softer.
Can children help with this simple gipfeli recipe?
Yes, kids love rolling the triangles and shaping them. Supervise the oven and sharp tools, and they will feel proud of their creations.
What if my gipfeli do not rise well the first time?
Check your yeast freshness and room temperature. Try again with these tips, and you will see improvement quickly.
Do I need bread flour or all-purpose is fine?
All-purpose flour gives great results in this recipe. Bread flour can make it a little chewier if you prefer that texture.
Disclaimer
This article is for informational and educational purposes only. It shares a simple home recipe to help you learn and enjoy baking. Results may vary based on your ingredients, tools, and kitchen. Please follow safe baking practices and food handling rules. Some images may be AI-generated for illustrative purposes only. All copyrights and trademarks belong to their respective owners. This is not professional cooking, medical, or nutritional advice. Consult experts when needed.
EXPLORE MORE
Oreo Cookie in a Cookie Recipe (The Best Oreo Stuffed Cookies)
Whipped Ricotta Recipe: Creamy, Light & Ready in 5 Minutes
Leave a Reply